
How to Make Flashcards from Your Notes
Knowing how to make flashcards from your notes is the difference between a notebook you never open again and a deck that actually moves facts into long-term memory. This guide covers the full chain: scanning your notes with a photo, the formatting rules that make a card worth reviewing, and when to build a deck by hand versus letting an app generate one for you. The goal is to turn messy lecture notes into exam-ready cards in minutes, not hours.
Key Takeaways
- Flashcards beat rereading because they force active recall: you retrieve the answer instead of just recognizing the text.
- A good card holds one idea, asks a real question, and keeps the answer to a line or two.
- To make flashcards from notes with a photo, shoot in good light, straight on, and crop tight around one definition or list at a time.
- Automatic generation gives you a fast first draft. The work that makes it stick is reviewing and cutting the weak cards afterward.
- A hybrid workflow wins: auto-generate the bulk, then add the conceptual cards that capture exam traps by hand.
- Whatever method you use, review with spaced repetition so hard cards surface often and easy ones fade into the background.
Why Make Flashcards from Your Notes Instead of Rereading
Rereading and highlighting feel productive, but they mostly build familiarity, not memory. You recognize the page and assume you know it, then blank on the exam. Flashcards work differently. Every card is a small test: you see the question, try to retrieve the answer, and only then check. That act of retrieval is what strengthens memory, an effect that decades of research on retrieval practice keep confirming.
There is a second reason to turn notes into cards. Once each idea lives on its own card, you can space your reviews. Instead of one long cram session, you see each fact a few times across days and weeks, which is far better for retention. Tools like the Leitner system and modern apps automate that scheduling for you, so you study a little every day rather than everything at once. For the science behind why timing matters, see our guide on the forgetting curve at /guides/forgetting-curve.
The catch is that making cards by hand from a thick stack of notes is slow. That friction is exactly why so many students give up. This is where photographing your notes and generating a first draft automatically changes the math: you get a reviewable deck in minutes, then spend your effort improving it rather than typing it.
What Makes a Good Flashcard
Before you scan anything, it helps to know what you are aiming for. The single most important rule is one idea per card. If your answer runs to a full paragraph, split it into several cards. A card you can answer in one or two lines is a card you can review quickly and grade honestly.
Phrase the front as a real question, not a fragment. "Why does the body release insulin after a meal?" forces recall in a way that "Insulin =" never will. Conceptual cards that ask you to compare, explain, or apply an idea are worth far more than cards testing an isolated detail. When it fits, practice both directions, term to definition and definition to term, so the link is strong either way.
Keep the back short and add support only when it earns its place: a small diagram for anatomy, a mnemonic for a list, a page reference so you can find the source again. A hint field that you reveal only when stuck is useful. A card buried under color and clutter is not. For more on building cards that hold up over a full course, see /guides/study-smarter-flashcards.
Good vs Bad Flashcard Design
| Element | Weak card | Strong card |
|---|---|---|
| Scope | A whole paragraph copied onto one card | One idea, answerable in a line or two |
| Front | A bare term or copied sentence | A real question: why, how, compare |
| Back | Everything you might need to know | A concise answer plus one supporting cue |
| Source of text | Pasted straight from notes | Reworded into a testable prompt |
| Extras | Heavy color, multiple sub-questions | One optional hint, image, or page reference |
Step 0: Prepare Your Notes Before You Scan
The quality of your cards depends on the quality of the source, and this matters even more when an app generates them automatically. Spend a couple of minutes prepping. Highlight the lines that should become questions, circle the key definitions, lists, and diagrams, and group your material by chapter or lecture so each deck stays coherent.
Your source might be handwritten notebook pages, printed slides and handouts, a textbook chapter, or a digital PDF. Each works, but legibility is what counts. For PDFs, selectable text is ideal because the content extracts cleanly. A scanned PDF that is really just an image needs the text read from it first, so expect rougher results. Either way, slice the material by section instead of feeding in one enormous file.
A little curation up front pays off twice. You skip the parts that would generate junk cards, and you give the generator a clean signal to work from. Notes that are already organized into definitions, lists, and clear examples turn into good cards almost on their own.
How to Scan Notes into Flashcards with a Photo
The photo workflow is the fastest way to make flashcards from notes you already have on paper. The rules are simple and they all serve the same goal: give the text reader a clean image to work from. Shoot in good, even light with no shadows or glare. Hold the phone flat and straight over the page, not at an angle, so the lines stay readable. Crop to the part that matters: one definition, one list, one boxed example.
Resist the urge to capture a whole dense page in one shot. Several tight photos beat one crowded one, because each gives a better signal-to-noise ratio and the generator is less likely to pull in headers, page numbers, and stray margins. Take separate photos for definitions, tables, diagrams, and worked examples so each becomes its own focused set of cards.
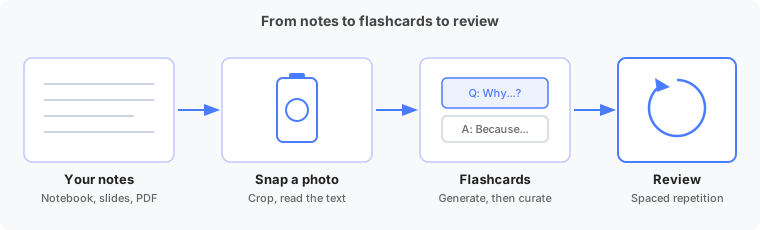
Diagrams deserve their own shot. Photograph the figure on its own, and you can turn it into labeling cards ("Name this structure") and function cards ("What does structure X do?") built from the same image. Apps designed for this, including Betta, guide you to crop the photo, read the text on device, and show you the detected content before any cards are generated, so you catch problems early. If you study mostly from your phone, this turns picture to flashcards into a few taps.
Automatic Flashcards from Photos and PDFs
Automatic generation is where a photo of your notes becomes a deck in seconds. An AI flashcard maker reads your image or PDF, picks out the key terms, definitions, and formulas, and writes question-and-answer pairs for you. Most tools let you set the input and output language, the difficulty, the number of cards per image or section, and the question style, from plain definitions to cloze deletions and "why" or "how" prompts.
This works beautifully for factual, well-structured material: anatomy, pharmacology, biology, vocabulary, lists of terms, formulas, and process steps. It struggles where nuance matters. The known risks are factual slips on technical topics, trivial questions generated from poorly structured text, and duplicate cards that pad your review queue without teaching you anything.
So treat the output as a first draft, never a finished deck. Skim every card, delete the trivial ones, merge duplicates, and add the conceptual cards the generator missed. Betta is built around this exact loop: photograph a page of notes, a textbook, or a printed slide, and you get a structured deck you can tune in a few taps. The speed is the point, but the quick review afterward is what makes the deck worth keeping.
Make Flashcards from Notes by Hand
Some material is worth writing by hand. Highly conceptual subjects like philosophy, law, and essay-based courses benefit from the thinking that goes into phrasing your own questions. So does anything where you want full control over exam-style prompts, such as clinical cases or multi-step problems.
The process is short. First, go through your notes and mark the testable ideas: definitions, lists, processes, and the mistakes you keep making. Second, turn each one into a clear question, leaning on why, how, and compare rather than a bare "X = ?". Third, break big paragraphs into several small cards instead of one monster card. Fourth, add minimal context on the back, a page reference or a quick example. Fifth, add a hint or mnemonic only if it genuinely helps.
In practice, the best approach for most students is hybrid. Auto-generate the bulk of a deck from photos or a PDF, then spend ten minutes adding the handful of cards that capture exam traps, past errors, and your own insights. You get the speed of automation and the depth of cards you actually thought about.
Manual vs Automatic Flashcard Creation
| Manual | Automatic (photo or PDF) | |
|---|---|---|
| Speed | Slow, card by card | A full draft deck in seconds |
| Best for | Conceptual, exam-style, nuanced material | Facts, vocabulary, formulas, definitions |
| Control over wording | Total | High, after a quick edit |
| Main risk | You run out of time and quit | Trivial or duplicate cards if you skip the review |
| Smartest use | Add the cards automation cannot capture | Generate the bulk, then curate |
Card Formatting Rules: A Quick Checklist
Once you are generating and editing cards, a short checklist keeps the deck clean. On the front, keep the question short and unambiguous, with no two questions stuffed into one. You want a clear "I know this" or "I do not" when you read it. On the back, stay concise, one or two lines, and split anything longer into separate cards.
Use cloze deletions when a sentence is already familiar: hide only the key word or phrase, not half the sentence. Add images for visual material like anatomy, cycles, and diagrams, where a picture does the work of a paragraph. Use color sparingly, for tags like subject or difficulty, not as decoration. Reserve the hint field for a real cue, an acronym, a mental image, or the first letter of the answer.
Organize Decks by Course, Tag, and Difficulty
A deck you can keep using is a deck that stays organized. Keep one deck per course, and split into sub-decks by chapter when a subject gets large, so "Bio 101" becomes "Cell biology", "Genetics", and so on. Tag cards by chapter, theme, difficulty, and question type so you can run targeted sessions, like reviewing only the cards you keep getting wrong.
Maintenance keeps the deck honest. Suspend or archive cards you have clearly mastered so they stop crowding your queue. Rewrite any card you fail several times in a row, because a card you keep missing is usually badly designed rather than impossibly hard. And delete the trivial cards that an automatic generator slipped in. A lean, well-tagged deck is faster to review and far less discouraging than a bloated one.
Review Your Flashcards with Spaced Repetition
Making the cards is only half the job. How you review them decides whether the facts stick. Spaced repetition is the method that works: you see hard cards often and easy cards rarely, so your study time goes where it is needed. The Leitner system is the classic paper version, with cards moving through boxes as you learn them. Read the full explanation in our guide at /guides/leitner-system, or work out a specific review date with the Leitner box calculator at /tools/leitner-calculator.
The habits that matter are simple. Always try to answer before you flip the card, so you are practicing retrieval and not just recognition. Mix the cards and practice both directions. Keep sessions short, around 15 to 30 minutes, but daily, and cap new cards at roughly 10 to 20 a day so your queue does not balloon. Reviewing a little every day beats two hours the night before, every time. For a deeper plan around test season, see /guides/spaced-repetition-exam-prep.
This is the part an app removes friction from. Betta wraps the same Leitner-style scheduling around the deck you photographed, so you open it each day and it serves the right cards at the right time. You do not sort boxes or track dates. You photograph your notes, get a deck, and review, and the spacing happens on its own.
Special Cases: Math, Diagrams, Languages, and Dense Texts
Different subjects need different cards. For math and science, pair "formula to name or use" cards with reverse "scenario to which formula?" cards, and add step-by-step cards that ask for the next move in a procedure. For diagrams, anatomy, and processes, build labeling cards and "what does structure X do?" cards from the same figure.
For languages, go beyond single words: use example sentences with a missing word, and learn collocations and idioms in context rather than as isolated translations. For dense readings in philosophy, law, and the humanities, make cards on the main theses, the arguments for and against, and the key definitions, not on every sentence. These are the cases where manual creation, or heavy editing of an auto-generated draft, pays off most, because the nuance is the whole point.
Common Mistakes to Avoid
- Copying notes onto cards verbatim instead of turning them into questions.
- Overloaded cards with several ideas, long lists, or whole paragraphs.
- Too many shallow detail cards and not enough conceptual ones.
- Never reviewing or cleaning an auto-generated deck, so errors and duplicates pile up.
- Flipping the card without trying to recall the answer first.
- Reviewing only in one direction and always in the same order.
- Building a giant deck the night before instead of feeding it gradually over weeks.
FAQ: Making Flashcards from Your Notes
- Is it better to make flashcards by hand or with an app?
- It depends on the material. For dense, conceptual subjects like philosophy or law, writing cards by hand forces you to process the ideas, which is part of the learning. For factual content like vocabulary, anatomy, or formulas, an app that turns photos of your notes into cards saves hours and gets you reviewing sooner. Most students do best with a hybrid: auto-generate a first draft, then edit it by hand.
- Can I make flashcards from pictures of my handwritten notes?
- Yes. Apps that read text from images can turn a photo of handwritten notes into flashcards, as long as the writing is legible and the photo is well lit and shot straight on. Clear, dark handwriting on a plain page works best. Tighter crops around one definition or list give better results than a full page packed with text.
- How many flashcards should I make per chapter?
- Quality beats volume. For a single chapter, aim for a focused set of the genuinely testable ideas rather than one card per sentence. Across a full course of six to eight weeks, roughly 80 to 150 well-chosen cards usually beats 500 shallow ones. If a card feels trivial or you always get it right instantly, cut it.
- How often should I review my flashcards with spaced repetition?
- A little every day beats a long session the night before. Spaced repetition shows you hard cards often and easy cards rarely, so a short daily session of 15 to 30 minutes keeps everything fresh without overload. Limit new cards to about 10 to 20 a day so your review queue stays manageable.
- What should I put on a flashcard?
- One idea per card. The front holds a single clear question, the back a short answer of one or two lines. Turn headings and definitions into real questions like "Why does X happen?" rather than copying sentences. Add a small hint, image, or page reference only when it genuinely helps recall.